
Creating an outline effect is usually fairly straightforward considering that there are a lot of resources out there that explain how something like that can be achieved. Things are a bit different with Unity HDRP precisely because there is a lot less information on that topic.
Let’s see together how we can achieve this effect.
The Final Outcome
What we aim to achieve here is an effect that:
- Displays the outline of an object (even when comprised of multiple meshes).
- That the outline be visible (or not) when part of the object is hidden by another object.
- Change the thickness.
- Be able to customise the colour of the edge (but also the colour and alpha of the inner part in case one wants to ad a highlight effect).
- Be renderer either before post-processing or after depending if we want anti-aliasing to be applied to the outline.

How Are We Going to Proceed?
That is an excellent question that kept me busy for more time than I care to admit. We’re going to proceed in several steps.
- First we are going to create a new GameObject layer to determine which objects will have an outline. This is what is going to make it possible to make systems that outline an object when it is hovered by the mouse.
- We’ll then use Unity’s Custom Passes that will apply special materials to create the outline effects.
- We’ll create two shaders related to two materials that will be used by those custom passes.
- Fianlly, we’ll look at some issues that may happen when we use TAA as an anti-aliasing method.
1. Creating a New Layer
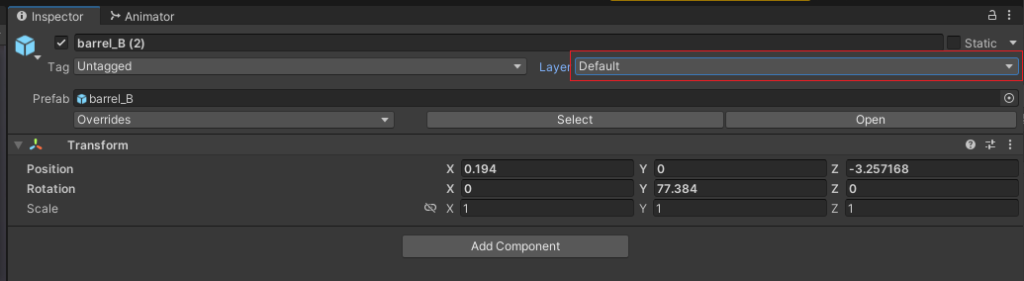
Probably the most straightforward step. When inspecting a GameObject, click on “Layer” then “Add Layer”. Create a new Layer that we’ll call “Selection”.
2. Creating Custom Passes
We’re now going to create Custom Passes that will intervene during the render pipeline to modify how our objects in the “Selection” layer are renderer.
Add a new empty GameObject in the editor, call it “Custom Passes” and add a “Custom Pass Volume” to it. Use the small “+” at the bottom to add:
- A Draw Renderers Custom Pass
- A Fullscreen Custom Pass

3. Creating the Shaders and the Materials
We’re now going to create two shaders in order to create two materials. The first shader will essentially simply pass the object’s silhouette with a flat color to the second shader. The second shader will create a slightly bigger version of that silhouette and fill the non-contour part with an inner color (that can be fully transparent).
In your project, create two shaders (Create -> Shader -> HDRP Custom Renderers Pass and Create -> Shader -> HDRP Custom Fullscreen Pass). Call them respectively “OutlineRendererShader” and “OutlineFullscreenShader” (or any other name you fancy).
As far as the code goes, here it is:
OutlineRendererShader.shader
Shader "OutlineShader/Objects"
{
    Properties
    {
	_ContourColor("Contour Color", Color) = (1,1,1,1)
        _MaxDistance("Max Distance", float) = 15
    }

    HLSLINCLUDE

    #pragma target 4.5
    #pragma only_renderers d3d11 ps4 xboxone vulkan metal switch

    // #pragma enable_d3d11_debug_symbols

    //enable GPU instancing support
    #pragma multi_compile_instancing
    #pragma instancing_options renderinglayer

    ENDHLSL

    SubShader
    {
        Pass
        {
            Name "FirstPass"
            Tags { "LightMode" = "FirstPass" }

            Blend Off
            ZWrite On
            ZTest LEqual

            Cull Back

            HLSLPROGRAM

            // List all the attributes needed in your shader (will be passed to the vertex shader)
            // you can see the complete list of these attributes in VaryingMesh.hlsl
            #define ATTRIBUTES_NEED_TEXCOORD0
            #define ATTRIBUTES_NEED_NORMAL
            #define ATTRIBUTES_NEED_TANGENT

            // List all the varyings needed in your fragment shader
            #define VARYINGS_NEED_TEXCOORD0
            #define VARYINGS_NEED_TANGENT_TO_WORLD
            #define VARYINGS_NEED_POSITION_WS

            #include "Packages/com.unity.render-pipelines.high-definition/Runtime/RenderPipeline/RenderPass/CustomPass/CustomPassRenderers.hlsl"

            float _MaxDistance;
			float4 _ContourColor;
            float _AlphaThreshold;

            // Put the code to render the objects in your custom pass in this function
            void GetSurfaceAndBuiltinData(FragInputs fragInputs, float3 viewDirection, inout PositionInputs posInput, out SurfaceData surfaceData, out BuiltinData builtinData)
            {
                if( length(fragInputs.positionRWS) > _MaxDistance ) discard;

                // Write back the data to the output structures
                ZERO_INITIALIZE(BuiltinData, builtinData); // No call to InitBuiltinData as we don't have any lighting
                ZERO_INITIALIZE(SurfaceData, surfaceData); // No call to InitBuiltinData as we don't have any lighting
                builtinData.opacity = 1;
                builtinData.emissiveColor = float3(0, 0, 0);
                surfaceData.color = float3(1,1,1) * _ContourColor.rgb;
            }

            #include "Packages/com.unity.render-pipelines.high-definition/Runtime/RenderPipeline/ShaderPass/ShaderPassForwardUnlit.hlsl"

            #pragma vertex Vert
            #pragma fragment Frag

            ENDHLSL
        }
    }
}
As previously mentioned, this shader simply transmits a silhouette of the object with a solid color (the color of the outline). It also rejects fragments that are beyond a certain distance from the camera (but you can remove that line if that’s not desired).
We define two properties here:
- The colour of the outline.
- The maximum distance at which we will render the outline.
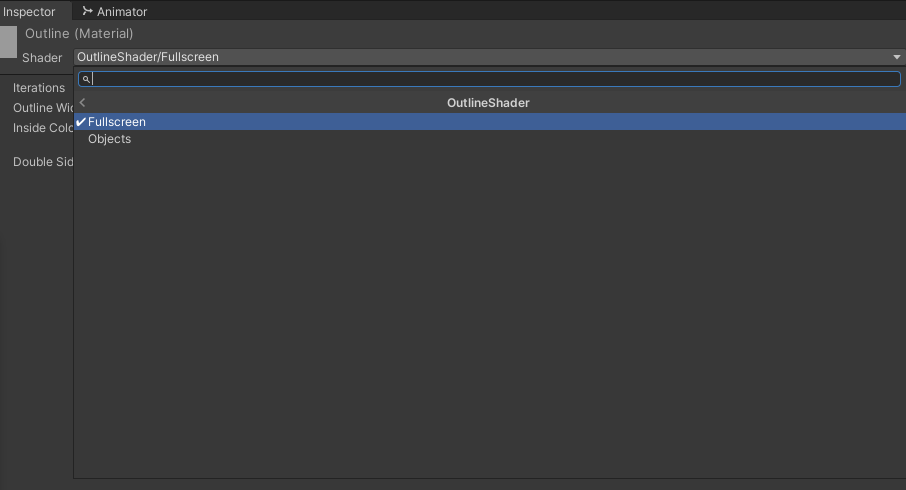
OutlineFullscreenShader.shader
Shader "OutlineShader/Fullscreen"
{
    properties
    {
        _Iterations ("Iterations", Range(1,3) ) = 1
        _OutlineWidth ("Outline Width", Float ) = 5
        _InsideColor ("Inside Color", Color) = (1, 1, 0, 0.5)
    }

    HLSLINCLUDE

    #pragma vertex Vert

    #pragma target 4.5
    #pragma only_renderers d3d11 ps4 xboxone vulkan metal switch

    #include "Packages/com.unity.render-pipelines.high-definition/Runtime/RenderPipeline/RenderPass/CustomPass/CustomPassCommon.hlsl"

    // The PositionInputs struct allow you to retrieve a lot of useful information for your fullScreenShader:
    // struct PositionInputs
    // {
    //     float3 positionWS;  // World space position (could be camera-relative)
    //     float2 positionNDC; // Normalized screen coordinates within the viewport    : [0, 1) (with the half-pixel offset)
    //     uint2  positionSS;  // Screen space pixel coordinates                       : [0, NumPixels)
    //     uint2  tileCoord;   // Screen tile coordinates                              : [0, NumTiles)
    //     float  deviceDepth; // Depth from the depth buffer                          : [0, 1] (typically reversed)
    //     float  linearDepth; // View space Z coordinate                              : [Near, Far]
    // };

    // To sample custom buffers, you have access to these functions:
    // But be careful, on most platforms you can't sample to the bound color buffer. It means that you
    // can't use the SampleCustomColor when the pass color buffer is set to custom (and same for camera the buffer).
    // float3 SampleCustomColor(float2 uv);
    // float3 LoadCustomColor(uint2 pixelCoords);
    // float LoadCustomDepth(uint2 pixelCoords);
    // float SampleCustomDepth(float2 uv);

    // There are also a lot of utility function you can use inside Common.hlsl and Color.hlsl,
    // you can check them out in the source code of the core SRP package.

    #define v2 1.41421
    #define c45 0.707107
    #define c225 0.9238795
    #define s225 0.3826834

    #define MAXSAMPLES 16
    static float2 offsets[MAXSAMPLES] = {
        float2( 1, 0 ),
        float2( -1, 0 ),
        float2( 0, 1 ),
        float2( 0, -1 ),

        float2( c45, c45 ),
        float2( c45, -c45 ),
        float2( -c45, c45 ),
        float2( -c45, -c45 ),

        float2( c225, s225 ),
        float2( c225, -s225 ),
        float2( -c225, s225 ),
        float2( -c225, -s225 ),
        float2( s225, c225 ),
        float2( s225, -c225 ),
        float2( -s225, c225 ),
        float2( -s225, -c225 )
    };

    int _Iterations;
    float _OutlineWidth;
    float4 _InsideColor;

    float4 FullScreenPass(Varyings varyings) : SV_Target
    {
        UNITY_SETUP_STEREO_EYE_INDEX_POST_VERTEX(varyings);

        float depth = LoadCameraDepth(varyings.positionCS.xy);
        PositionInputs posInput = GetPositionInput(varyings.positionCS.xy, _ScreenSize.zw, depth, UNITY_MATRIX_I_VP, UNITY_MATRIX_V);
        float3 viewDirection = GetWorldSpaceNormalizeViewDir(posInput.positionWS);
		float4 c = LoadCustomColor(posInput.positionSS);
        float2 uvOffsetPerPixel = 1.0/_ScreenSize .xy;
        uint sampleCount = min( 2 * pow(2, _Iterations ), MAXSAMPLES ) ;
        float4 outline = float4(0,0,0,0);
        for (uint i=0 ; i<sampleCount ; ++i )
        {
            outline =  max( SampleCustomColor( posInput.positionNDC + uvOffsetPerPixel * _OutlineWidth * offsets[i] ), outline );
        }

        float4 o = float4(0,0,0,0);
        o = lerp(o, float4(outline.rgb, 1), outline.a);
        o = lerp(o, _InsideColor, c.a);
        return o;
    }

    ENDHLSL

    SubShader
    {
        Pass
        {
            Name "Custom Pass 0"

            ZWrite Off
            ZTest Always
            Blend SrcAlpha OneMinusSrcAlpha
            Cull Off

            HLSLPROGRAM
                #pragma fragment FullScreenPass
            ENDHLSL
        }
    }
    Fallback Off
}
There’s a bit more going on here than in the first shader. We also define some properties here:
- The number of iterations to create the outline. A higher value leads to a more precise outline.
- The thickness of the outline.
- The inner colour (that may be transparent and completely invisible).
With these inputs, the shader simply uses the depth buffer and position information to create a bigger version of the object’s silhouette. Once that is done, the inner part is coloured differently.
Now we only need to create two materials using those two shaders in our project (Create -> Material). Name them as you wish.
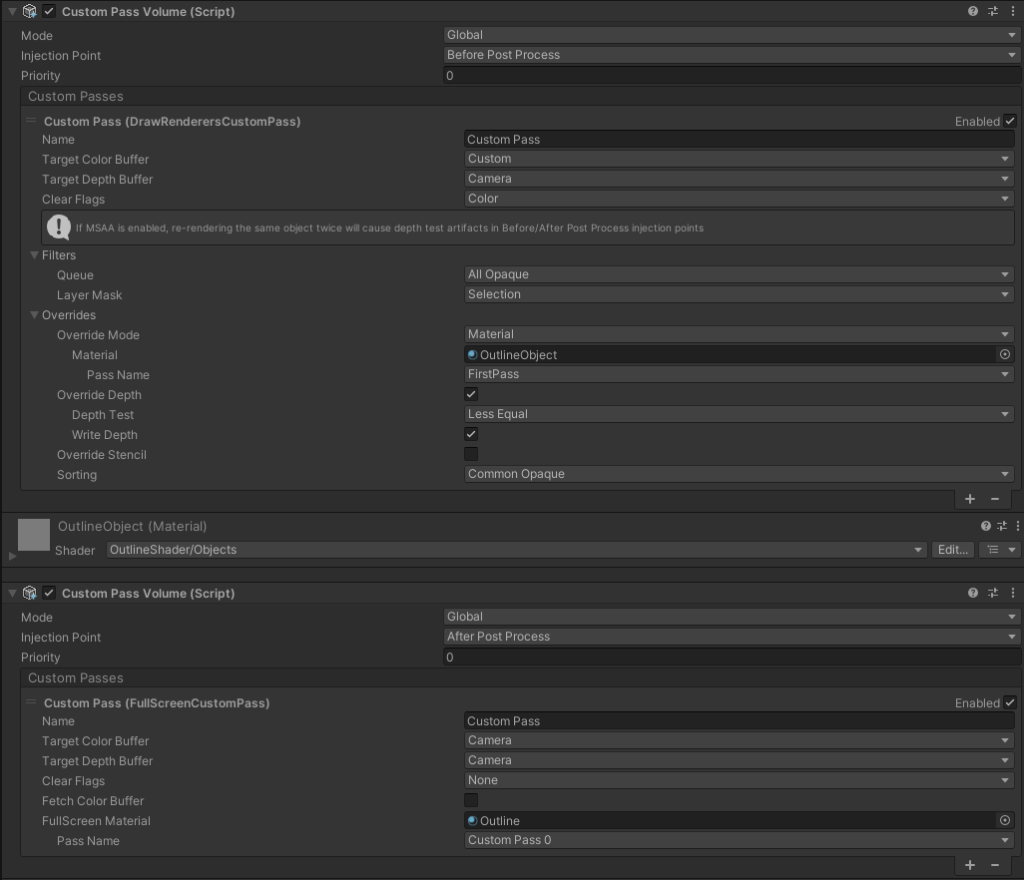
Finally, we assign those new materials on the custom passes. Make sure that the object material is assigned to the renderer custom pass and that the fullscreen materials is assigned to the fullscreen custom pass.
You can play around with the depth test override in the renderer custom pass. Setting it to “Less Equal” for example will occlude hidden parts of the object and not use them to create an outline.
4. A Little Fix
If you use Temporal Anti-Aliasing (TAA), you’ll see that a few issues may occur. The outline has a tendency to blur / move slower than the object when the camera moves.
This is due to the fact that our custom passes are injected before post-processing (that includes applying TAA) and so our outline is also affected by TAA (and all its pitfalls).
If you change the injection point to “after post-processing” you’ll see that it mostly works except if you choose to use the depth override. As TAA changes the depth buffer, that creates a lot of flickering lines.
The best you can do in that case is split your custom pass volume into two separate ones. One will be injected before post-processing and apply the renderer custom pass and the second will apply the fullscreen pass after post-processing as follows:
That’s it for now. It’s still possible to improve some things but we have a good basis.